
LTI 1.3 (Learning Tools Interoperability) integration in Brightspace can provide educators and learners with a seamless experience when accessing external tools and applications. We will guide you through the step-by-step process, starting from the LTI configuration screen to the finalizing of the connection in the GivePulse settings. By following these instructions, you'll be able to successfully leverage the power of LTI 1.3 within Brightspace and enhance your teaching and learning environment.
Step One: Whitelist Your LMS Instance
Email support@givepulse.com to request that your LMS Instance URL be whitelisted before proceeding. Failing to do so may result in errors when integrating Brightspace with GivePulse.
This article will cover the following:
- Linking GivePulse to Brightspace
- Deploy GivePulse in D2L
- Finalize D2L Connection in Settings
- Add GivePulse to D2L Course
Linking GivePulse to Brightspace.
Go to your group’s management dashboard.
Click on 'More Tools' to 'LTI.'
You will see the below LTI Configuration screen.
With the GivePulse Configuration window still open, open a new tab or browser and log into D2L as an admin. Navigate to Settings (the gear icon), and click 'Manage Extensibility.'
Access the 'LTI Advantage' tab, and click on the 'Register Tool' button.
Select the 'Standard' registration option.
Fill out the form.
- 'Enabled' - Toggle ON.
- 'Name' - Set to GivePulse and add a description (Optional).
- 'Domain' - Copy the Domain from GivePulse Configuration. Paste the GivePulse Domain into the D2L Domain field.
- 'Redirect URLs' - Copy the OIDC Redirect URL from GivePulse, and Paste the OIDC Redirect URL into the Redirect URLs field within D2L.
- 'OpenID Connect Login URL' - Copy the OIDC Connect Initialization field from GivePulse. Paste the OIDC Connect Initialization field into the OpenID Connect URL Field.
- 'Target Link URL' - Same as Redirect URL
- 'Keyset URL' - Copy the Keyset URL from GivePulse. Paste the Keyset URL from GivePulse into the Keyset URL field within D2L.
- 'Extensions' - Enable all Extensions.
-
Roles - Check 'Send Institution Role.'
Click 'Register,' and the registration details will appear. This information will be used at a later step (Finalize D2L Connection in GivePulse configuration).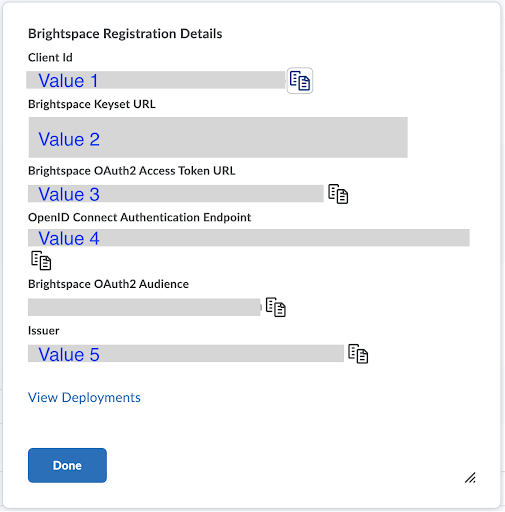
Deploy GivePulse in D2L
Access the settings by clicking on the gear icon, and clicking on 'External Learning Tools.'
Under the 'LTI Advantage' tab, click 'New Deployment.'
Complete the form:
-
- 'Enabled' - Toggle the switch to ON.
- 'Tool' - Choose the GivePulse tool you previously registered.
- 'Name' - Set to GivePulse.
- 'Description' - Optional field.
- 'Extensions' - Check all boxes.
- 'Security Settings' - Fill out per your organization’s policy.
Click the 'Add Org Units' button.
In the open modal, look up any Org Unit (Department, Semester, Course, etc.) that you want to make this tool available to. Check the corresponding boxes, and click the 'Add' button when you are done.
Scroll to the bottom of the page, and click 'Create Deployment.'
Finalize D2L Connection in GivePulse Settings
-
Go back to the GivePulse Settings window, and click the 'Next' button. Complete the form with the Brightspace Registration Details values obtained earlier (see Registration section, step 8).
For "Application Key" and "Secret" enter "N/A".
- Client ID - Copy the Client ID from D2L. Paste this value into the GivePulse Client ID field.
- Deployment ID - In D2L: Gear icon → External Learning Tools → GivePulse → Deployment ID at the bottom of the page.
- Issuer - Copy the Issuer value from D2L. Paste the Issuer value into the Issuer field within GivePulse.
- Auth Request Endpoint - Copy the OpenID Connect Authentication Endpoint from D2L. Paste this value into the Auth Request Endpoint field within GivePulse.
- Select Keyset URL.
- Keyset URL - Copy the Brightspace Keyset URL from D2L. Paste this value into the Platform Keyset URL field within GivePulse
- Auth Token Endpoint - Copy the Brightspace OAuth2 Access Token URL from D2L. Paste this value into the Auth Token Endpoint field within GivePulse.
- Click Save.
Add GivePulse to D2L Course
- Access the settings by clicking on the gear icon, and click on External Learning Tools.
- Under the LTI Advantage tab, click on the GivePulse tool you deployed.
- Scroll down to the bottom of the page, and click on View Links.
- Click on New Link.
- Enabled: Toggle the switch to ON.
- Name: Set to “GivePulse”.
- URL: Copy and paste the OIDC redirect URL from the GivePulse Configuration page
- Click Save and Close
- Go to the course to which you want to add the tool.
- In the top navigation of the course, click Content.
- Under Table of Contents, click the module to which you want to add the tool (you may need to Add a module).
- Click Existing Activities, then External Learning Tools.
- Choose the Link you created in step 4
- To Launch the GivePulse Click the link to the tool.
If you have any questions, please Submit a Support Ticket.
Comments
0 comments
Article is closed for comments.