
If you are a group admin or an event admin, you'll be able manage, edit, and view registrations for an event.
This resource will go over these topics:
- How to navigate to Manage Registrations
- Waitlist, Minors Signups, Group, and Guest Registration Settings
- Registration Status Defined
- Cancel or Decline a User's Registration
- Manage Registration with Calendar View
- Reassign Registration
- Video overview on Manage Registration as an Admin
How to navigate to Manage Registrations:
In your group or event view, you can navigate to your Dashboard Menu:
From the event public page in New View:
- Navigate to the event page and open the Manage menu on the left side of the screen. From there, select Manage Registrations
- From here you will see the entire list of those users who have registered for your event
Note: you can use the status column to filter for users who have canceled their registration or joined the waitlist.
From the Event Dashboard:
- In the event dashboard select Registrations > Manage Registrations (as shown below) on the left-hand admin panel
- From here you will see the entire list of those users who have registered for your event
- Note: you can use the status column to filter for users who have canceled their registration or joined the waitlist.
- Pro Tip: Use Configure Layout - Admin Panel to hide and show columns on the grid. You can also drag and drop the order of the columns and be sure to scroll down and click "Apply" to see the changes.
You can select Display to Hide Old Records.
Past or old records will be hidden from view.
Waitlist, Minors Signups, Group, and Guest Registration Settings
As an administrator and event manager, when making a new event, you have the opportunity to update its registration settings.
Note: Waitlisting, Guest Registration, Minors Registration, and Group Reservations default settings are turned off. Only an administrator can enable these features and some features are only available for paid subscriptions.
Edit Event > Registration Settings:
After applying the above settings, you can view the registered users and their respective statuses (e.g., waitlist or other specific registration statuses) through the "Manage Registrations" workflow. This can be accessed by navigating to "Events" > "Registrations" or selecting "Manage Registrations" within a specific event.
Note: In the case where the column 'Status' is not displayed, you can "Configure Layout" and select "Status" and filter by status.
Registration Status Defined:
- Registered: User completed all registration requirements. User is registered for the event.
- Waiting Approval: User completed registration; awaiting admin approval.
- Unconfirmed: User's registration is incomplete; requirements missing and spot is not reserved.
- Waitlist: User registration is on the waitlist, the event or shift is full.
- Declined: User registration is declined.
- Cancelled: User registration is cancelled.
- Attended: User registration is marked as attended.
- No Show: User registration is marked as 'No Show'
Note: An admin can always update the status of the registration record as "registered" to overfill the event and that will email the registrant informing them that they are now registered.
If you don't manually add them this way, and if someone cancels, or you add more spots, they will automatically be added in the order they were added to the waitlist.

Cancel or Decline a User's Registration
Sometimes you may need to cancel or decline a user's registration. This will open the user's spot and take them off the sign-in, thus creating a more accurate report of who will be attending your event.
Cancel: Use "Cancel" if a user has informed you that they are unable to attend the event
Decline: Use "Decline" if you have decided as an event organizer not to involve the user in the event and wish to inform the user
Please note that choosing "Decline" or "Cancel" for a user will open up their spot and make it available. The difference is in their ability to re-register:
- If declined, a user cannot re-register.
- If canceled, a can re-register.
- This helps track users who canceled their registrations on their own versus those who were declined.
Additionally, if you need to manually add someone to the waitlist, you can do so via Manage Registrations > In line Actions > Waitlist:
If you "Cancel" a registration, the user will receive an email with the subject line "Cancelled registration for {Event Name}" that looks like:
If you "Decline" a registration, on the other hand, the user will receive an email with the subject line "Sorry, your registration was declined for {Event Name}" that looks like:
One difference is that a user can self-cancel their event by navigating to "Registrations" under "My Activity" and selecting "Cancel" from the actions box.
However, a user cannot decline their own registration. If a user's registrations are declined, they will encounter a message like this when visiting the event:
Note: if there are multiple shifts or recurrences for an event, you will need to decline or cancel each shift/recurrence individually.
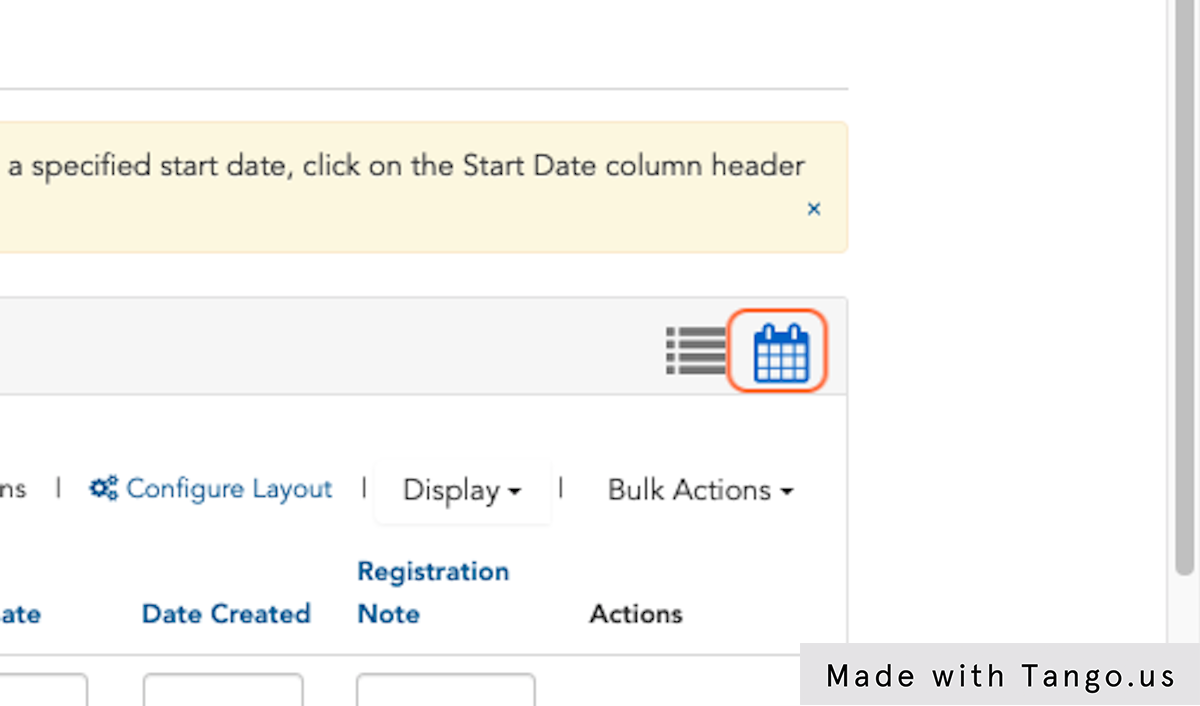
Manage Registration with Calendar View
As an admin, you can view Event Registrations for the group by Calendar or List View. You will navigate to the Group Dashboard Menu > Events > Manage Registrations. On this page, in the right hand corner, you can switch from List View or Calendar View.
Click on Calendar of Events
You can filter by Event Date, Event Name, or Select Show Registrants or Show Registrants by event and shift.
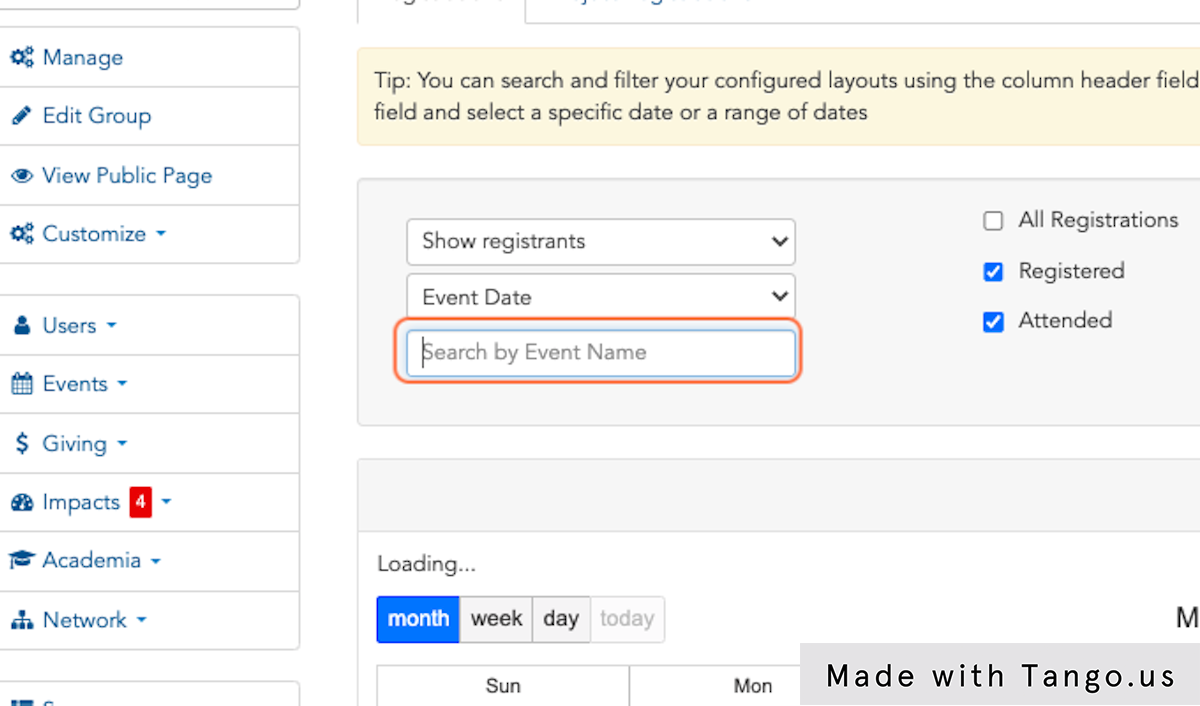
You can check which filters you would like to expose on the calendar with the check boxes provided.

Reassign Registration
"Reassign registration" is an inline action where you can transfer a registration from one shift to another shift or event. This can occur for various reasons, such as if the original registrant is unable to attend the shift or accidentally registers for the incorrect shift or event.
You will navigate to Events > Manage Registrations and use the inline Actions drop down menu to select 'Reassign'
You can choose from the drop down menu, which event or shift you can reassign the registrant to correctly.
Then, it will move the registrant to the correct event or shift.
Here is a video overview on Manage Registration as an Admin
Managing Registrations as a Shift Organizer
Anyone in the role of Shift Administrator or Shift Organizer can also manage shifts and registrations.
- From your User Dashboard after logging in, navigate to Manage in the upper right navigation bar.
- You can click Manage > Shifts.
- Manage Shifts will bring you to a list of shifts where you are assigned as the Shift Organizer or Shift Administrator.
- If you select a shift, you can see the shift details as well as use the Blue Actions Buttons for more options.
- From the Blue Actions Buttons you have various actions you can take, like Manage Registrations.
You can see details of the registrants who registered to the specific shift.
You can click the In Line Action drop down menu to see other actions you can use.
Comments
0 comments
Article is closed for comments.