
Admins can create a network of subgroups within their network to organize various departments, programs, and student organizations.
Subscription Note: Your organization may have a limit on the number of subgroups allowed depending on your subscription level. For more details about each subscription tier, please visit the GivePulse Pricing Page. If you have any questions about your specific subscription, please reach out to your Client Success Manager and/or the GivePulse Support Team (support@givepulse.com).
This article will over the following:
- Subgroups Defined & How to Create New Subgroups
- Administrative Groups Defined & How to Mark a Group as Administrative
- How to View your Network's Hierarchy
- Managing Subgroups Youtube Tutorial Video
Subgroups Defined & How to Create New Subgroups
Subgrouping is a tool that enables group administrators to organize a network of groups, departments, and organizations. Within a network, administrative access rolls down the network and user data rolls up the network. This means that group administrators at the parent group can manage all subgroups as well as collect a high-level perspective of data within the network.
To create a new subgroup, first ensure that you are in the Group Admin Dashboard of the group you want the subgroup to be bested beneath. From the Group Admin Dashboard, navigate to Network > Add Subgroup.
GivePulse Pro Tip: As you continue to create new groups under the parent group, make sure they are being created under the correct parent network. Click here to learn more about how to quickly changing the group you are viewing within your network.
Administrative Groups Defined & How to Mark a Group as Administrative
Marking a group Administrative serves as a tool for organizational purposes, enabling administrators to maintain data and generate reports. It functions as a way to hide groups that are currently inactive as a means to preserve data while keeping the group out of public view.
For example, if you have two programs under the Academic Office, you can create a subgroup named "Academic Office" for external visibility. Once created, you can mark the group as administrative. This will make the group private and inaccessible to users, but still give administrators a way to organize their data within the hierarchy.
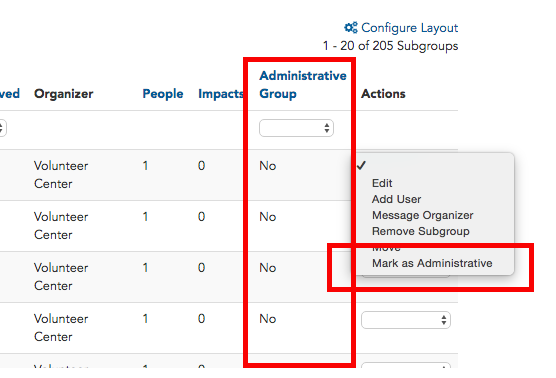
To mark a subgroup as administrative, from the Group Admin Dashboard, navigate to Network > Manage Subgroups. Locate the subgroup in the grid. In the Actions Dropdown Menu, select Mark as Administrative.
Note: Marking a group Administrative will close any events and users will no longer be able to view the group or create impacts to those events or the group.
Note: Administrative groups can still create new events for their current members.
How to View your Network's Hierarchy
Admins have the ability to see a visualization of the current set up of their network. From the Group Admin Dashboard, navigate to Network > Network Visualization.
GivePulse Pro Tip: You can show/hide subgroups with multiple subgroups underneath by clicking the node of that subgroup.
Managing Subgroups YouTube Tutorial Video
Comments
0 comments
Article is closed for comments.